The MiLL
Marauder Innovation Learning Lab
MAKING WHAT'S NEXT!
Creating a .Makerbot File
To create a .makerbot file, first open the MakerBot desktop software.
Once the software opens, the first thing you will need to do is make sure that the right printer type is selected. To do this, click on Device at the top of your screen. Then go to Select Type of Device and choose Replicator (5th Generation).
Once you have selected the proper device you can now import your model. To do this, first click on the Prepare tab from the list of icons at the top of the interface.
Next you will need to add your 3D model to the build platform. To do this, click on the Add File button that appears just below the Prepare tab that you just clicked on.
Now you can select the file you wish to add. Note that the MakerBot software will only take three types of files, .stl, .obj and .thing files so your model will need to be in one of these formats. Once you find the file you wish to add, click Open.
Your file will then appear on the build platform in the software.
To help ensure you have a successful print, you will want to make sure that your model is in the proper place on the build platform before you prepare it for printing. In order to do this, there are some quick changes we can make by using the tools that appear on the left hand side of the interface.
First we are going to make sure that our model is in the center of the platform and that it is sitting on the surface of the platform. To do this, double click on the Move Objects icon which is the second icon on the left hand side that looks like four arrows. When you do a window should pop out from the side of it.
Click the On Platform button to move your model all the way down so that it is touching the build platform.
If you do not do this and your model is sitting above the build platform, it is likely that your print will fail.
Next you can center the model by clicking the Center button.
The final change we need to make is accessed by clicking on the Rotate Objects icon which is directly below the Move Objects icon.
In this window you will need to click on the Lay Flat button. This will rotate your model to a flat surface to help ensure that the model is laying flat on the build platform.
Next you will need to check the settings that you would like to have for the print. Click on the Settings button at the top of the screen.
A window will pop up in which you can change the settings of your print.
In order to ensure that your print remains within the guidelines for submission, there are a few settings that you will need to change. The first to look at is the Quality setting on the left hand side of the window. There are three different options you can choose for the quality and they are Low, Standard and High.
It is best to keep this on the Low or Standard settings. Printing at High quality is unnecessary for most models and it will increase your filament usage and print time significantly.
Next to the Quality setting you will see two checkboxes that say Raft and Support.
The Raft setting should be turned on by default but if it is not, go ahead and click the checkbox to turn enable it. This setting is required for all prints.
Next you will need to decide whether or not you will need Support for your print. Supports will be needed if any part of your model will be printing over negative space. If so, you will need to enable the Support setting by clicking the checkbox. This will allow the printer to print scaffolding that you can break off after the print is finished.
If you are unsure whether or not you need supports, it is best to err on the side of caution and turn this setting on. Most failed prints are the result of not having the Raft and Support settings turned on.
The next setting you want to look at is the Infill setting directly below the Raft and Support checkboxes.
To help lower your print time and filament usage, bring this down to 3%.
Click on the dropdown menu and select Smart Extruder + from the list.
Once you have finished changing these settings you can click OK to close the window.
Now you can preview your print in order to see how much filament you will be using. Click on the Preview button in the top right corner of the interface.
When you do, the MakerBot desktop software will compile a preview of your print in a new window that will pop up.
In the top right hand corner of this window you will see the total amount of material your print will use and how long the print will take.
Make sure your material use is under 30 grams. If you are over 30 grams, you may need to scale down your print or select a lower quality to get your print under the 30 gram limit. If you are having problems please don’t hesitate to contact us and we can help you get your settings to what they need to be.
If you are printing as part of a class project, your specific gram restriction may vary. Please consult with your instructor or class assignment for the correction number of grams per print.
Once you are done you can close the preview window by clicking the Close button in the lower left hand corner.
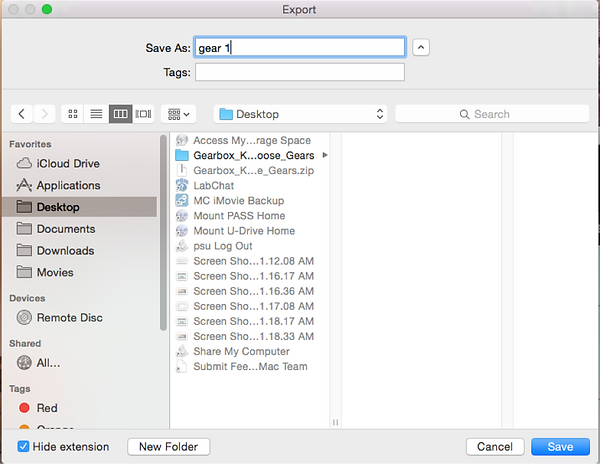
The final step will be exporting your print file. To do this, click on the Export Print File button located in the top right corner of the interface next to the Preview button.
In the window that appears, give your file a name and select where you would like to save it. Then press the Save button in the bottom right hand corner of the window.
Once you do, the MakerBot software will process your file and when it is finished, your model will appear as a .makerbot File in the place where you saved it.
You can now take this file and upload it to the MakerBot Innovation Center software using your account in order to start your print.